![Ten Tentacles [dot] Com](http://tententacles.com/wp-content/MyHeaderImg/MyHeaderImg.php)
One of the hardest things for me to wrap my head around, when I first started playing Elite: Dangerous, were ship modules, their sizes and ratings, and how all those pieces fit together to form a ship that could excel at a given task. The amount of times I still see What’s the Best Build for X type posts on the official forums, and on reddit, leads me to believe it’s still an issue for many. For this reason I thought I’d put together a post detailing everything I know about ship outfitting in the hopes that it will help someone outfit their ship to do whatever it is they enjoy doing most in game. I don’t claim to be an expert, but I have outfitted a lot of ships, in a little over a year of playing the game, that have all performed to my liking. Take what I offer here with a grain of salt, and if you see something missing, or something out of whack, drop me a comment.
Ships
The three most important factors to consider, when designing a ship for almost any role, are power consumption, single jump range, and over all operating range. In simpler terms, how much power do the systems and tools you want require, how far can the ship jump, and how many jumps can you make consecutively before you need to refuel. Generally speaking, the ship’s type has the most bearing on those three factors.
The most important decision to make is what type of ship you need or want for the role you intend to play. This is important because it determines the maximum size and number of modules that can be fitted. There are currently 29 playable vessels in Elite Dangerous: Horizons 2.1 (not counting the CQC fighters or the new ship being added in the upcoming content patch). These ships have designated roles, including: Cruise Ship, Explorer, Fighter, Freighter, and Multipurpose. They also come in sizes ranging from Small to Superheavy (though there are really only three sizes: small, medium, and large). The role and size of a ship has a direct bearing on its power requirements and single and overall jump range.
While any ship can be outfitted almost any way you’d like, the designated roles (which can be found in the in-game descriptions in the station Shipyards) are a good guideline for the types of jobs a ship can best fulfill; Fighters are good at combat, Freighters and Explorers will typically have longer jump ranges and more internal compartments, and Multipurpose will generally have a good balance of all three. Detailed descriptions of all the in-game ships can be found in the Elite: Dangerous Wiki. Size is also important as it determines what kinds of stations you can land on or dock with. Most stations have small, medium, and large landing pads, but many of the smaller orbitals and even some planetary bases only have small and medium.
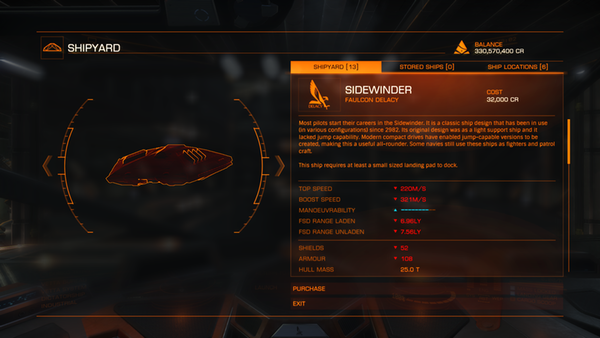
Of course, which ship you can buy is entirely dependent upon how many credits you have available to spend. For this reason, going forward, I’ll be using the cheapest ship in the game, the Sidewinder, for all my examples. The topics I have covered and will cover here can be applied, however, to any ship in the game. Choose the best ship for the job that you can afford.
Modules
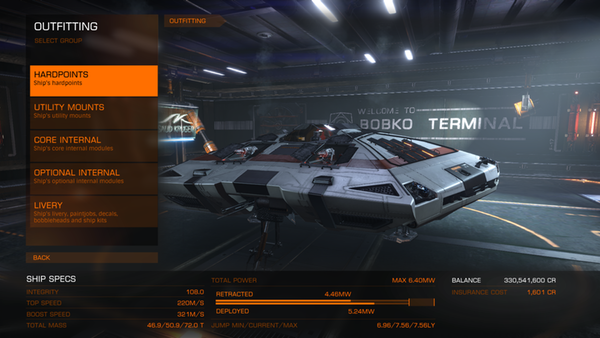
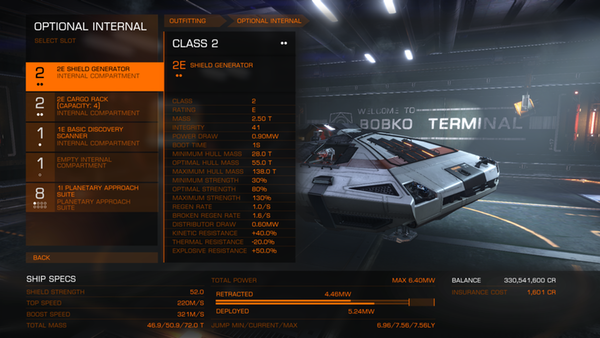
Once you settle on a ship type for the job you want to do, it’s time to get down to outfitting it to do that job. You outfit your ship by adding or replacing four different types of modules found in the station Outfitting bays. The four types of modules are: Hardpoints, Utility Mounts, Core Internals, and Optional Internals. Hardpoints are your weapons and mining lasers; they’re retractable and do not consume power while retracted. Utility Mounts are optional, small tools like scanners, countermeasures, and shield boosters that attach to the exterior hull of the ship. Core Internals are the modules that every ship must have in order to function. Finally, Optional Internals are the modules that really define a ship’s role. These are things like cargo racks, celestial body scanners, refineries, etc. that take up internal compartments. In other words, they are things you only need for whatever job you are trying to outfit the ship to do.
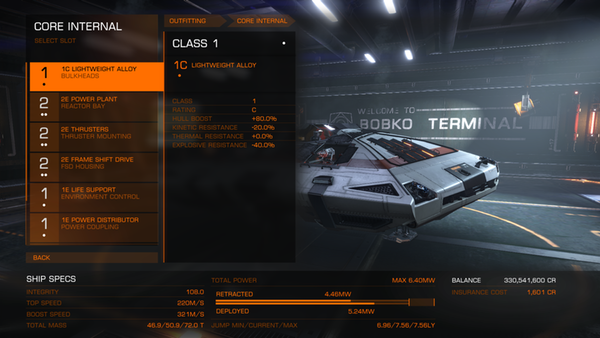
Every module has a size, currently ranging from 0 to 8. The size of a module is not its mass, but its physical volume, or how much space it takes up inside your ship. The ship’s internal compartments, where the modules are slotted, have a maximum size rating. This means you can generally slot a module of that size or smaller in that compartment. As an example, if the Reactor Bay in a ship’s Core Internals is listed as a 2, it means you can fit a size 2 Power Plant or smaller in it (though the smallest Power Plants are size 2), depending on your power needs. Another example is if an Optional Internal compartment has a size of 8, you could slot a Cargo Rack of a size 1 through 8.
Every module also has a rating, currently ranging from E to A where E is the cheapest, lowest quality and A is the best in slot. Take that with a grain of salt, though, because best in slot is really determined by what you need to do the job. A rated modules generally have the best capabilities and are the most expensive. There is also an I rating, but its pretty much limited to Utility modules, and it’s the only rating available for those modules. D rated modules tend to be the lightest, as far as mass it will add to the ship. B rated modules tend to be the heaviest, as far as mass, but draw less power. C rated modules are generally a happy balance of cost, capability, power requirements, and mass. Not all modules are available in every rating, and some, like Cargo Racks, only come in an E rating; it’s a rack … it doesn’t use power, it just takes up space.
Putting Them Together
So, you’ve chosen a ship and you know what job you want it to do. You also, hopefully, now have some understanding of what the types, sizes, and ratings of modules mean. The scope of discussing every type of module available in game is too big for this particular post, but if you’re not sure what a module does, you can look it up either in any station’s Outfitting bay (for modules that particular station has available for sale), or you can look them up in the Elite: Dangerous Wiki.
That said, I have put together a few example builds for a Sidewinder (the starting ship) on Coriolis.Io, so that I can demonstrate some of the properties discussed above. Incidentally, Coriolis.Io is an excellent utility for playing around with Elite: Dangerous ship builds. I usually build ships there, then I use EDDB.Io’s Stations page to find the closest stations to me that sell the ship and modules I’ll need to build it.
Clicking on each of the links above will take you to a Coriolis.Io page for that specific build. If you compare them you’ll see that some of the Standard or Core Internals change based on the role or resources needed to operate role specific Internals, Hardpoints, and Utilities.
The Explorer is built around the need to make long jumps between stars, scan star systems, and land on and explore any non-atmospheric, rocky bodies that look interesting. As such, almost all of its Core Internals are D rated, keeping the ship’s total mass as low as possible which increases its single jump range. The only exception is the Frame Shift Drive, which is A rated, giving the ship the maximum possible single jump range for the drive’s size and the ship’s mass. A cargo bay would be nice, for any Unknown Artifacts or Probes it might come across, but there’s no room for it and an Explorer is really about gathering cartographic data, which doesn’t require cargo space. A Detailed Surface Scanner would be good too, for getting detailed and valuable data on celestial bodies, but again, there’s no room so the basic data gathered by the Advanced Discover Scanner will have to do. Shields are technically optional, but anyone who flies without them is just asking for the slightest bump to completely destroy the ship. The Shield is D rated, though, to keep it light; it’s not a lot of protection, but it’ll absorb accidental bumps. A fuel scoop, for an Explorer, is essential as it pretty much makes the ship’s overall range unlimited. A higher rated scoop would let the ship scoop fuel faster, but it would also be heavier. It’s a tradeoff. Incidentally, Fuel Tanks only come in C rating, but you can add Fuel Tanks as Optional Internals if you have space. In the case of this Sidewinder, we don’t. The Planetary Vehicle Hanger is for the SRV used to explore planetary surfaces. The standard, Lightweight Allow hulls will work just fine for this and most any build.
The Trader is not dissimilar from the Explorer, in its job requirements, in that it needs to be able to jump as far as possible, for as long as possible, without stopping to refuel. It doesn’t need to scan or explore things, but holds full delicious cargo tend to attract pirates, so it needs those Cargo Racks and a way to avoid pirates. We swap out all of the Optional Internals for Cargo Racks, except the Shields which we boost to an A rating. This will help the ship absorb some fire while it turns tail and runs. The A rated Thrusters and Power Distributor will help us do that, allowing the ship to boost as often as possible until the Frame Shift Drive engages. Finally we add some Countermeasures to take care of Gimbaled weapons, Missiles, or Hatch Breaker Limpets the pirates might throw at us while we’re running.
The Miner has some similar job requirements to the Trader; it needs to carry some cargo and it needs to avoid pirates. Most of the systems, where mining is profitable, have stations so a fuel scoop isn’t all that necessary. It does need some specialized equipment, though, in the form of a Refinery and a Mining Laser. These two modules use quite a bit of juice, so a better Power Plant is necessary. I went with a B rated Power Plant because it has the least output required for the price. Prospector and Collector Limpet controllers would be ideal, but this is a Sidewinder, and there just isn’t any room. So, we’ll be scooping up the ore with the Cargo Hatch (standard equipment on all vessels).
Finally, the Hunter. Like the other vessels, the Hunter needs to be able to get around as efficiently as possible and needs to eek the most in speed and boost recharge as possible from its Power Plant. This helps you get to where your targets are and stay on their sixes and out of their line of fire. Adding two Gimbaled Pulse Lasers, an FSD Interdictor, and a Kill Warrant Scanner requires more juice than any of the previous builds, so we upgraded our Power Plant to an A rated unit. The C rated Kill Warrant Scanner is the best we can slot for the power the size 2, A rated Power Plant is putting out. We could drop the Chaff Launcher for an FSD Wake Scanner if we had piracy in mind instead of bounty hunting, but for a hunter they aren’t all that useful; a bounty could jump to a system where they’re not wanted and then we might incur a bounty ourselves if we attack them. The cargo space is for anything valuable our targets might drop in the course of a fight. We also upgrade the hull to a Military Grade Composite because, lets face it, we’re going to get shot at … a lot.
Wrapping it Up
Obviously the above examples aren’t the best ships for the roles described, but I wanted to show how module types, sizes, and classes come into play when outfitting any ship to be passable at any job. I definitely recommend playing around with Coriolis.Io. It is a fantastic resource for Elite: Dangerous. Try out different ships, slot different size and class modules and see how they affect the power consumption bar in the bottom left, and the ship statistics in the top bar.
If you read this far, I hope you found some useful information in this post. As always, direct your comments, cusses, and fusses to the comments section below.
[…] I’ve outlined for Smuggling here, in this post, and the tips I provided on ship outfitting here. Either way, you’ll want a fast ship, with a good range and cargo capacity, and the skills to […]
[…] if you follow Bronchosaurus’s tips on trading ship progression, and keep in mind some of my own tips about ship outfitting, you’ll be able to always be in the most efficient ship you can afford, hauling in the […]
[…] they are good starting points. You can adjust them to your liking, and, if you need help, I have a post on ship outfitting that offers some general […]