![Ten Tentacles [dot] Com](http://tententacles.com/wp-content/MyHeaderImg/MyHeaderImg.php)

STOP! This Secret Monday post is going to be a little different. It is the first in a four part series that will provide detailed walkthroughs, with solutions, for the four Investigation Missions in the Sidestories: Further Analysis mission pack. Over the next three weeks, the Knights of Mercy and I will be working our way through these missions, stretching them out until the release of Tokyo, Some Time in May™, and I’ll be chronicling our progress here. If you have not yet completed these missions, or aren’t looking for solutions, I suggest you not read past the bump. Spoilers will abound. You have been warned.

The Animate Clay begins at The Modern Prometheus, Dr. Aldini’s surgical theater / laboratory. If you’re not sure where this is, head out of the garage where the Manhattan Agartha Portal is and hang a left. You should see the wacky Frankenstein’s Monster graffiti pictured above off to your right. The door to Dr. Aldini’s salon is in there. It is a Solo instance, so if you’re doing this mission in a group, you’ll be on your own for this portion. Don’t worry, Dr. Aldini is only dangerous if you actually pay him for surgery.
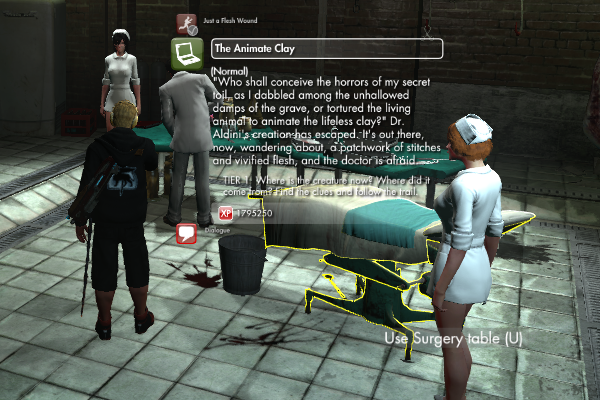
Picking up the quest from Dr. Aldini will trigger a cut-scene. It’s pretty awesome, so watch it. I’ll wait … Ok, once that’s over, your next step is to look for clues in the good doctor’s lab. There are two: a letter and a computer.
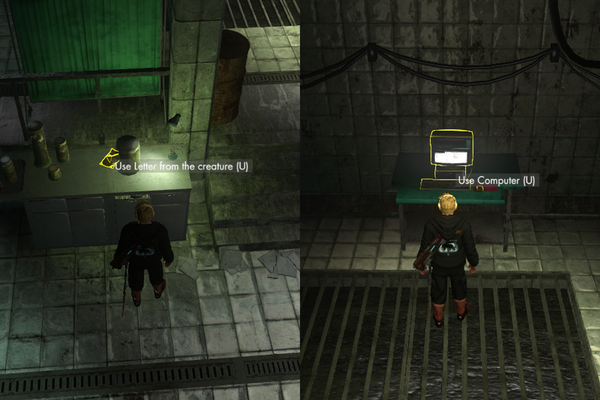
Accessing the letter just requires a click and it contains a clue as to where the Creature went, “I begin my search in the lowest parts of the city, whence came your victims.” Getting to what is on the computer is a little trickier. You’ll need to guess the password. The password hint alludes to “the creature’s favorite book.” A few Google searches later led us to a reference to some of the works Frankenstein’s Monster enjoyed in Shelley’s famous novel. One of them is Paradise Lost. Typing “paradise lost” in as the password will get you access to a lot of flavor text and a very important journal entry made by Dr. Aldini. This entry contains a clue to the location of an account number you’ll need later.
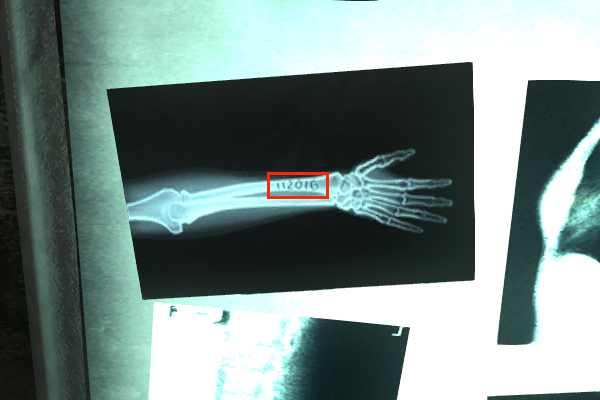
In the journal entry, Dr. Aldini mentions something about carving a number into the bone of his arm. On one of the walls in the lab there are several x-rays. One of them contains the number you’ll need. Incase you can’t make out the image above, the number is 112016. With all this information in hand, it’s time to head into the sewers of Manhattan.
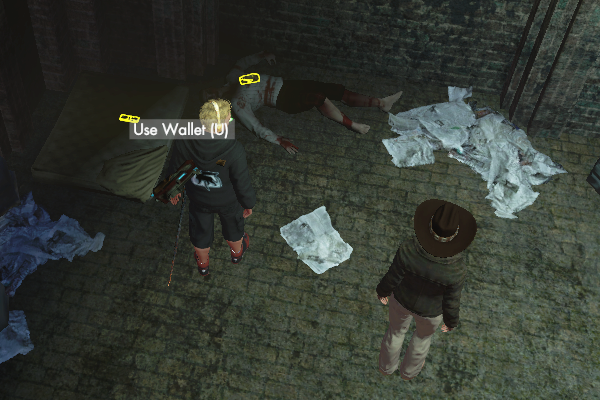
If you’ve played the Illuminati story line, or have ever had cause to look for the Illuminati HQ, then navigating the sewers should be a breeze for you. If, however, you’re like most of us were last night, it might take some fumbling around. If the later is the case, I’ll try to save you some time here. If you hang a right when leaving The Modern Prometheus, then another right, and then a left you should be at the entrance to the sewers. It’ll be a door with a blue Illuminati eye in graffiti around it. Enter the door and go down the stairs as far as you can go. There will be another door that leads to a staircase with a pipe railing in a large room. Across from the staircase is a set of three arches. Take the center one. It will bend around to the right and lead to a room with a burning drum of trash in it. Go to the right of the drum and take the passage there. It will turn left and lead you to a room with a cement mixer in it. The clues you need are in an alcove to the left of the cement mixer.
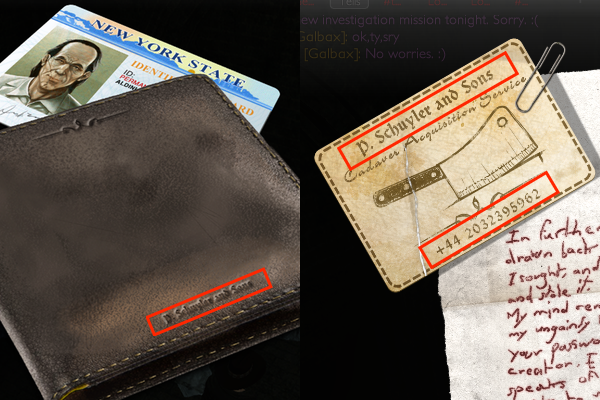
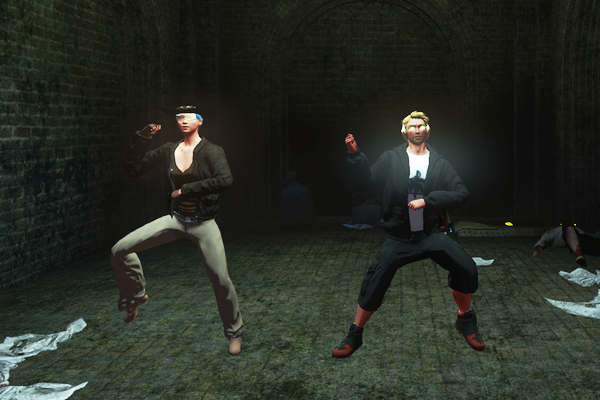
The two clues here are Dr. Aldini’s wallet and another letter from the Creature. The wallet is rather nondescript, but it is embossed with the manufacturer, P. Schuyler and Sons (which, incidentally, means it’s probably made from human flesh given the nature of said manufacturer’s line of work). The letter has a business card for P. Schuyler and Sons attached to it. You can actually call the number on it (Mogsy used GooleVoice for .2 a minute), or check out this Youtube video of someone who already did. Either way you’re going to need to listen to the message as it contains an audio clue for the next step in the mission. Syp and I had to wait a little while Mogsy and Rich worked out some account issues. When we’re bored, we DANCE!
Clues in hand, our group complete, and our dance fever sated, we headed to London. The message at the other end of the P. Schuyler and Sons phone number mentions The Shades. This is an alley in London, plainly labeled on the London map. When you reach the alley, you will find several bits of trash that you can click on.
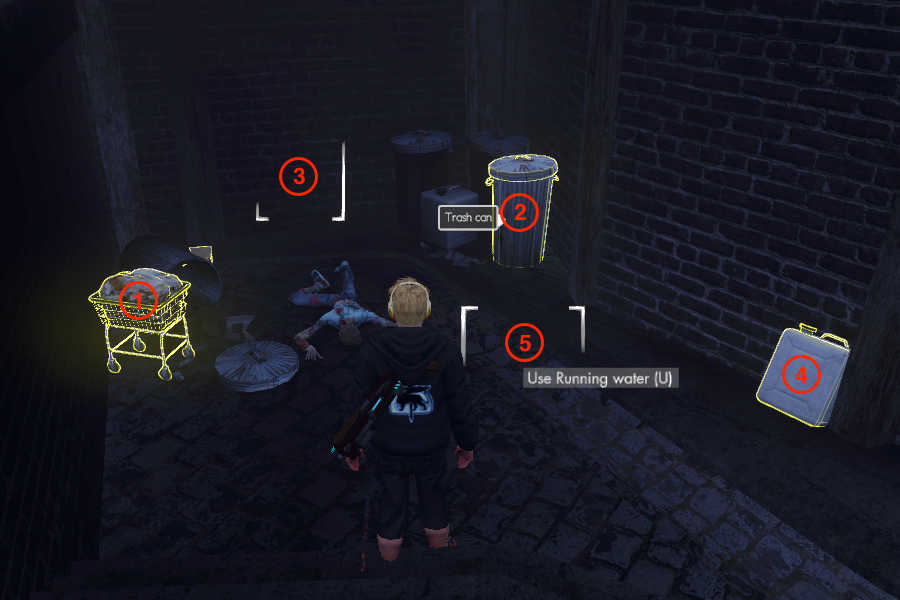
If you listened to the message you’ll note that there is a jingle at both the beginning and the end of the message. This jingle is the clue. You need to reproduce the first five notes of the jingle using the the trash in The Shades. Clicking each one will produce one note. Doing it in the wrong order resets it. The order you want, as labeled in the image above, is Plastic Container, Trash Can, Wall, Shopping Trolley, Running Water. Once you get the order right, the corpse in the middle of all the trash will stand up. Clicking on him will produce a rather unique keypad. Here is where that account number from the x-ray comes in handy. Entering 112016 and pressing the red button will produce the next clue in rather spectacular fashion.
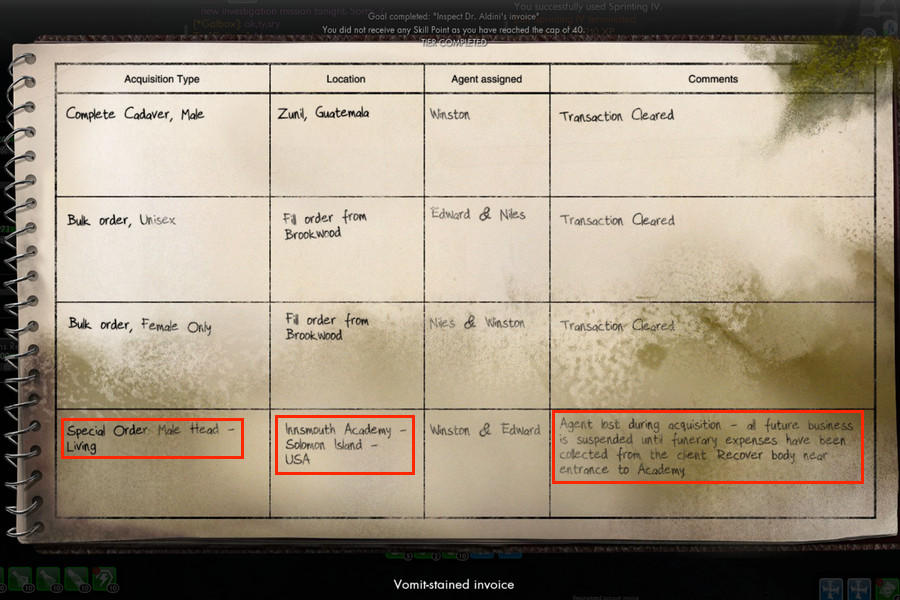
The invoice has lots of information, but what you’re looking for is a brain, or more specifically a head. It’s the last item on the invoice and was acquired from a body near the entrance to Innsmouth Academy. This is where you’ll need to go next.
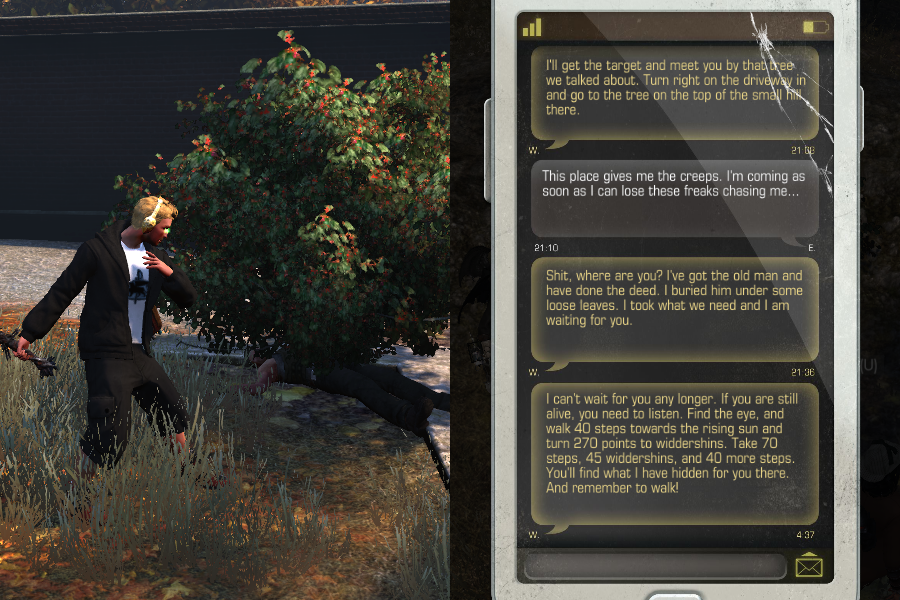
Head to Savage Coast in the Solomon Islands. Once there, head to the main gate of the Innsmouth Academy. The body is under a bush to the left of the main gate, inside the courtyard. Next to the body is a cellphone you can click on. The last text conversation is rather hilarious, but contains some direction as to where to go next. The mention of a tree on a small hill is kind of a red herring. The important parts are in the last text message. The starting point for these directions is the main gate. The eye they reference is the ward symbol on the ground at the main gate. In order to follow these clues we hit ‘backspace’ to enable walking and walked it out. Here’s what we did: From the gate count out 40 steps East. From there, turn Counter-Clockwise 270 degrees – you should end up pointing directly South. From there count out 70 steps heading South. Turn Counter-Clockwise again until you’re pointing directly Southeast and count out 40 steps.
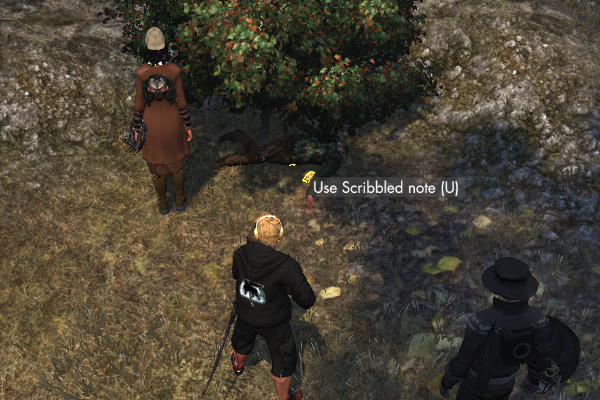
You should arrive at another bush under which another corpse is hidden. Next to this corpse are a note and an ID Badge. The note directs you to head into the Academy. The ID Badge is a little trickier. At first glance there appears to be nothing useful on it: the owner’s image is covered in blood as are any other bits of identifying information. However, the barcode is completely unblemished. If you use a barcode reader, like this one, it should show you the value of the barcode, which is 01221121. You’ll need this number for the next step.
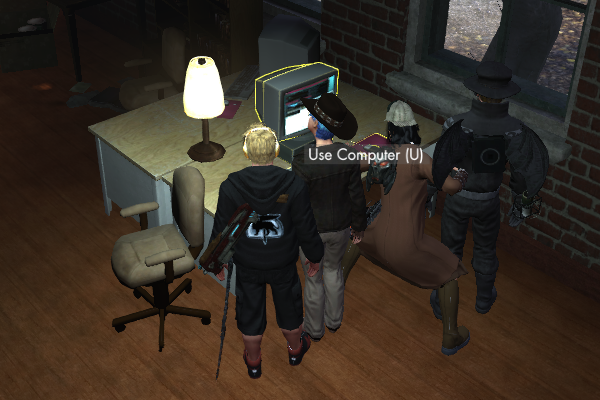
Head into the main entrance to the Academy and take the first door to the left, toward where all the quest givers are. Just inside the door is a computer you need to use. Enter 01221121 to gain access to two entries and advance the quest.

The text in these entries will direct you back to Manhattan. There is mention of several names, two of which are John and Adams, and a place where they intersect. The spot you’re looking for is the corner of John St. and Adam St., just outside and to the left of the garage where the Agartha Portal is in Manhattan. There’s a sewer grate that you can click on. The instance beyond it is accessible by a group, but the Creature isn’t hard to beat at all.
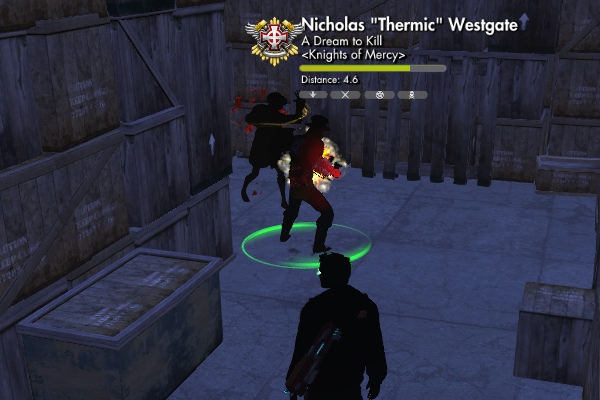
The Creature can be found in the maze of crates to the right of the entrance. In order to get in there you’ll need to somehow turn off the electrified puddle. Luckily there are a couple of fuse boxes along the wall to the left of the entrance. Once inside the maze, go right, then left and straight on until you’re only option is another left. Then left again and he should be right there. You’ll need to kill him once. After a few moments he’ll stand back up and the quest will advance indicating that you need to kill him permanently. Lead him back to the once electrified puddle, kill him in the puddle, then run and click a fuse box to turn it back on. Once he’s dead, turn it back off and run back to read the last note and complete the quest.
We had a ton of fun doing this mission in a group and, if you have the opportunity, I highly recommend it. Group or Solo, though, I hope you found this walkthrough helpful. Tune in next week for the next installment.
“From the gate count out 40 steps East. From there, turn Left 270 degrees – you should end up pointing directly West. From there count out 70 steps. Turn Left again until you’re pointing directly Southwest and count out 45 steps.”
Not sure this is right? “Widdershins” basically means “counter-clockwise”. So, starting East take 40 steps, then turn 270 degrees which would point you *South*. Take 70 steps.Turn 45 degrees to your left, which would face you *Southeast*, and then take *40* more steps. Is this more like it?
Or add up all the triangles, and it’s 120 steps at 305 degrees widdershins. 😛
The only part that messed me up was the phone call. I couldn’t wrap my mind around that they wanted us to make an international phone call! I looked it up, and from AT&T, that’s about a $2 call per minute. But eh, I could swing that. 🙂 … just too bad I had to call it twice because I still kept getting the audio puzzle wrong. 😛
Yep! You’re totally right. I know widdershins means counter-clockwise. Where I messed up he instructions was instead of turning 270 degrees I turned TO 270, which is West. Doh. I was looking at a compass when I was writing them out. I did the same thing with the second turn. LOL I’ll fix it.
There, she is fixed! And thanks for spotting that! Also, yeah. The phone call was kind of a WTF moment. But Mogsy rode to the rescue with GoogleVoice where it’s apparently .2 a minute. Also, Syp found the YouTube post of the call and we used that to listen to the tune over and over. Heheh.
Maybe they changed it since yo did it, but when I just did this quest, your numbers were wrong for The Shadows Alley, it was Cart, Trash Can, Wall then plastic container, Water.
Hmm, I’ll have to run through it again and test it. But, thanks for the heads up! 🙂
Yep, you are correct. They must have changed it because I know I tested these again when the cooldown wore off on the quest, after I ran it the first time. I do know initially that the cart and the water bottle used to make the same tone. Perhaps that was what they changed. In any case, thank you for letting me know about the change, and the image in the post should now be fixed.