![Ten Tentacles [dot] Com](http://tententacles.com/wp-content/MyHeaderImg/MyHeaderImg.php)

This morning I finally earned the last few Aureus of Initiation I needed to meet the 80 token price tag for The Council’s Seal. This final step completes The Venetian Agenda (after a bit if running around and a cut scene), and presumably (given everything revealed in said cut scene) unlocks Tokyo. I should point out that this is all very achievable; I’ve run all three scenarios on Normal/Solo mode, earning mostly bronze and silver ratings with a couple of golds, once a day since the launch on Thursday (including two complete failures). Doing so takes a little over an hour, and is something I think even mostly casual players can readily achieve. No, unlocking Tokyo isn’t the big challenge of this Issue. The challenge of this Issue is unlocking and slotting Augments.
After launch on Thursday I posted about my first impressions, including a list of tips for Scenarios I had gleaned from running them earlier in the day. Most of that list holds true, though I will change two bullet points: use the speed boosts whenever you come across them, and there are lores in the Scenarios.
Since that post I’ve discovered a few other things that have helped me along the way and also sort of cemented my opinion of the best way to tackle Solo Scenarios, especially if they are giving you difficulty. Before I get into that, I wanted to lay out the build I use for Solo Scenarios. It’s a modification of a Survival/AoE Mob Grinding build pkudude99 turned me onto (thanks, man).
Blade/Shotgun Scenario Survival Build
The Stats
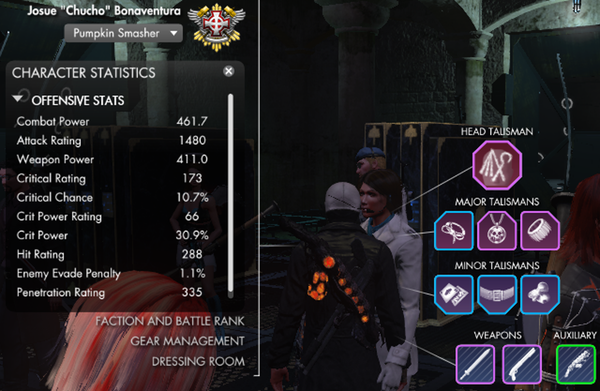
As you can see above, they aren’t the most awesome stats out there, but they are decent, especially coupled with the QL10.1 Epic Weapons I got from Cat God, and the QL10.1 Epic Custom pieces from Issues 6 & 7 (I can’t remember where I got the wrist, but it’s a QL10 Epic). Head, Wrist, and Occult are Attack pieces, Neck, Finger, and Waist are Health pieces, and the Luck Talisman is a Healing Piece, giving me an overall health of 6900+. I focused mostly on Penetration as a few of the Passives I’ve selected add damage when I Penetrate.
The deck itself, listed below, focuses exclusively on AoE damage. The Passives are an even split between adding damage or placing HoTs on me. I have a PBAoE Builder with a PBAoE Consumer and a TAoE Consumer. Bomb Squad is a manually targeted AoE, but if you hold down LSHFT, press and release LCTRL, then release LSHFT it’ll turn it into a TAoE for as long as you’re logged in. I then have a self heal and two Hinders/Interrupts. The Second Interrupt is also an AoE Aggro grab, which is very handy. I like Flamethrower for my Auxiliary Weapon.
Actives
- Bamboo Cutter
- Clearing the Path
- Riot Act
- Bomb Squad
- Turn the Tables
- Trial by Swords
- The Art of War
- Dragon’s Breath
Passives
- Shoot’Em Up
- Arterial Pulse
- Sudden Return
- Hit & Run
- Leeching Frenzy
- Circulation
- From the Abyss
- Searing Magnesium
This load out and deck have gotten me through successful completion of all three Scenarios on Normal difficulty, while Solo. I’ve yet to earn the illusive Platinum victory rating, but I have gotten a couple Golds and Silvers. This leads me into my current philosophy concerning Scenarios.
I am presently of the opinion that, especially when running Scenarios solo, any Scenario victory condition you can walk away from is a good one. By this I mean that, when it comes to the current and only Seek and Preserve Objective, Bronze isn’t the 3rd loser; it’s the 4th winner. Taking a page from Spock, the needs of the many outweigh the needs of the few, or the one. This is especially true if you, like me, aren’t sitting on a mountain of QL10.4 Custom Epics.
Given the random nature of the Scenarios, in many cases you’re are going to be presented with situations where more than one group of Survivors are being attacked simultaneously. In cases like these, especially when random weather or filth bombs make it difficult to move between barricades, or you haven’t gotten any supply drops, you have to choose one group to defend, and hunker down. Remember, losing the other groups may only earn you a Bronze, but losing them all gets you nothing but a one hour cool down before you can try again; four Aureus of Initiation are better than none.
When entering into the Scenario grind (and, lets face it … that’s what it is, though so far it has been immensely entertaining), you can’t go in with the notion that you are going to power through it all and get all the Things™ and Augments before Tokyo opens up. The Augment system is an incredibly slow burn, given the random nature with which the Augments themselves drop, and the metric assload of mats it’s going to take to Attune the Unattuned Augments. Augments are something you’re going to be working on well into Tokyo and beyond. Entering Tokyo only takes 80 Aureus of Initiation which, as I said above, is very achievable.
For me personally, with The Council’s Seal behind me, my next step is to replace all my QL10 Rares with the QL10 Epics sold by the female Minister of Ca’ d’Oro. Once that’s done, I’ll tackle all the Things™ on the male Minister of Ca’ d’Oro, all the while slotting and attuning any Augments that drop. I think this should be pretty achievable before Tokyo drops, especially since theoretically the new gear will help improve my performance in Scenarios. We’ll see how it goes.
As a final note, I want to leave some tips on the Wave Bosses. Most of them are easily taken down with some kiting. I make sure to engage them in, or kite them to, as open an area as I can find that is well away from any Survivors. A few of them have massive AoEs (which often are actually doughnut shaped with a little tiny safe zone right around the Boss) that’ll eat up Survivors in a New York minute. Almost all are interruptible, at least on Normal mode (hence the two Hinders I carry), but there is one asshole of a Vampire in The Castle (he’s been the final Boss on two of my runs) that has an uninterruptible AoE that heals him incredibly fast if you’re caught in it. The best bet for that one is just to run the hell away until he’s done spewing it all over the place. There is a random boss, a Sand Golem I believe, that can appear. For the most part he can be ignored; he follows a set patrol pattern, rather than running at the nearest survivors, and only aggros if you approach him. There are bonus points for killing him, but he’s very difficult to take down and Waves continue to attack your Survivors while you struggle to kill him. Kiting him near Survivors, to defend them while killing him, is a huge mistake.
I’m not subbed, so I could only do the Hotel so far (though I bought the rest of the pack today, but I haven’t done Castle or Mansion yet either). My 1st run I did in my regular solo build, which is so very similar to what you have posted (you subbed in Trial by Swords in place of Spiral of Death, looks like — FWIW, I like Gross Anatomy as my elite passive now. Makes every builder after the 1st do a ton more damage). Anyway, 1st run I did that and got a bronze. Part of it was that I got caught in the filth bomb, and another part was that big sand golem that you mentioned.
2nd run, I tried out one suggested by Ciritty on the forums going Chaos/AR (and frankly, I didn’t really use the AR stuff. . . ) and I got a perfect run and platinum. That was nice! But I felt it was an easier run too. Didn’t have the filth bomb or the golem to contend with. No idea how well or poorly I would have done if it’d been like my 1st run, ya know?
It killed slower, but it used high-hate builders to be a little tankier, plus some heal pieces and the AR stuff ostensibly for self-heals if needed (though on the 2nd run I never did). Still…. worked well overall.
Now on to the other maps and difficulties!
FWIW, on my bronze run I got 9 aureas in total and on the platinum run I got 16 so I’m at 25 of the 80 I need in only 2 runs. I can’t imagine it will take very long to get more, especially after I add in group runs and such.
Yeah. I definitely think that performance on any given run is highly dependent on what random things get thrown at you.
On my few gold runs there usually weren’t any storms or filth bombs, I got extra supply drops, and waves attacked one barricade at a time. They only weren’t perfect because I didn’t find all the survivors in phase 1. That’s just learning the maps better.
Conversely I’ve had runs where everything that could go wrong, storms, bombs, extra bosses, no supply crates, could and I barely squeaked out a bronze. LOL
I’m actually totally ok with this. It makes the grind less grindy. 😀
I was thinking of trying an AR Hammer build, AoE focused, and see how that went, but my current one works pretty good.
I’ve got my post about my 2nd attempt up, if you care to check it out.
[…] them down. I’m not sure that’s absolutely necessary. As I’ve expressed here, and here, I think that expecting a Platinum score in any given Scenario is a bit defeatist. Like pretty much […]